
September 27, 2020
This is for demonstration and educational purposes only. Enjoy responsibly!
Misplacing the root password on a Linux system can be catastrophic. Whether intentional (malicious) or accidental, being unable to log into the root account can bring a system to a standstill – updates, user management, storage management, and a host of other services could be disrupted. Luckily, Linux offers a way to reset the root password without knowing the current password. The only caveat is that physical access to the computer is required (and a little know-how!).
This demo will be performed on a CentOS 8 Virtual Machine, but it could be accomplished just as quickly on any physical computer (with Linux installed). The process is the same for all Linux computers that use Grub2, except for SELinux usage (see below). The first step is to reboot the computer and pause at the Grub2 menu (usually a 5-second prompt during the boot process to press any key):
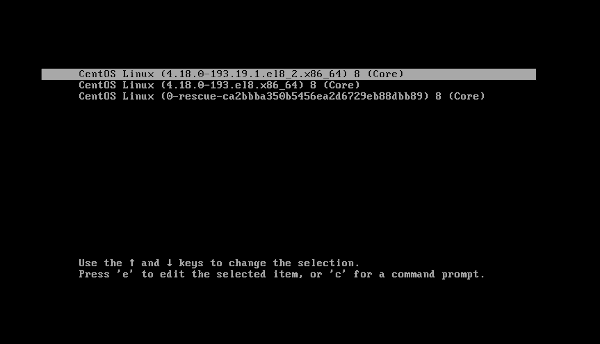
The system may have more than one kernel installed; select the correct (usually latest) one and press e in the Grub2 menu to edit the kernel arguments. This will result in a screen similar to this one:
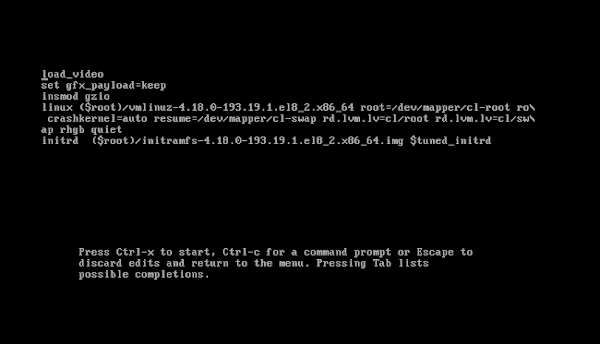
In this screen, find the line that starts with linux and modify the end of it. The rhgb argument enables “Red Hat Graphical Boot,” while the quiet argument prevents the kernel from displaying boot-up messages. Remove rhgb quiet and add rd.break, as seen below. The rd.break argument causes the boot process to display a root shell once the InitRAM file system is loaded before systemd has been initialized.

rhgb and quiet, add rd.breakOnce the kernel arguments have been modified, press Ctrl-X to continue. After booting, a root shell will appear without having to enter a password:
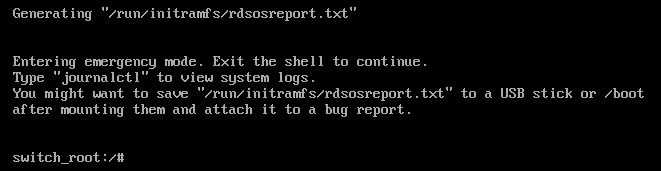
root prompt in Emergency ModeA root shell has appeared, but we’ve not yet gained access to the proper system. This prompt points to the InitRAM file system, which resides only in RAM during the boot process, not the appropriate file system that the system operates normally. The standard file system is mounted in /sysroot directory within the InitRAM file system. To make matters worse, /sysroot is read-only by default (at this stage). To reset the root password, you must mount it with read/write access. In the screenshot below, the last line of the result of the mount command shows current read-only access. The command to remount the /sysroot file system in read/write mode is mount -o remount,rw /sysroot:
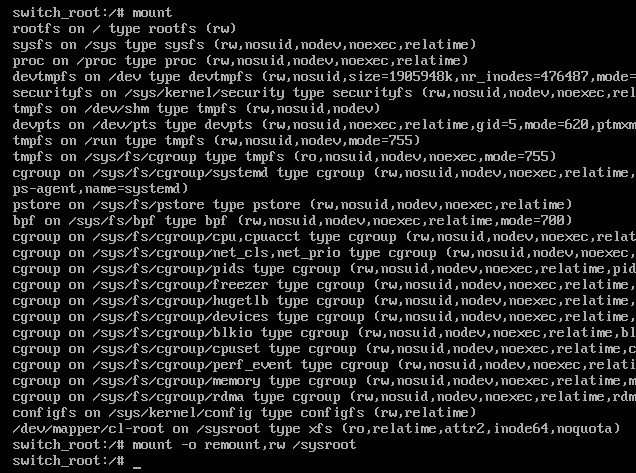
mount command shows the available file systemsNow that /sysroot is mounted in read/write mode, the next step is to navigate to the /sysroot directory and change it to the base directory:

chroot the /sysroot directoryNotice that once the /sysroot directory becomes the root directory, the shell prompt changes. Once this has been accomplished, it is possible to change the root password in the standard method using the passwd command:

root passwordThe previously unknown root password has been changed! However, as this is a CentOS 8 system with SELinux enabled, we need to create a file to signal SELinux to recreate its permissions. Failing to do this will result in an unbootable system because various systemd services will not start. To avoid this, create a file called /.autorelabel:

/.autorelabelAt this point, the procedure is complete. To summarize, we remounted the primary file system in read/write, changed the root password, and prepared SELinux for this change. Press Ctrl+D twice, and the system will boot normally with the new root password. This process will take longer than usual, as SELinux needs to recreate its policies (messages from SELinux during boot):

Mission Complete! The root password has been reset on the system without knowing the previous root password!